有时,您可能需要通过在网站外提交内容来增强您的在线形象并覆盖更广泛的受众。例如,您可能希望在最流行的社交网络聚合器上提供您的帖子,或者在移动设备上提供它们,或者在数字商店上发布您的音频/视频播客。
在大多数情况下,有必要通过添加自定义元数据来自定义 RSS Feed,使其适合发布。
在本教程中,我们将了解如何在两个主要平台上实现此目标:Flipboard 和 iTunes Store,但代码可以轻松针对其他平台和 Web 服务进行自定义。
简介
Flipboard 是一款适用于 Android 和 iOS 设备的社交网络聚合应用程序,它会定期从您的网站获取内容并以杂志格式呈现,以便移动用户可以通过智能手机或平板电脑上安装的应用程序阅读您的新闻。 iTunes Store 是一个在线数字媒体商店,您可以在其中发布音频或视频播客。
这两项服务的订阅都是免费的,但需要经过批准,特别是 Flipboard 似乎只接受拥有大量读者的网站。
它们都允许您通过博客 RSS Feed 发布内容,但这必须符合它们的规范。幸运的是,WordPress 允许开发人员修改默认的 RSS Feed 结构。
第 1 步默认 WordPress RSS 提要结构
默认情况下,WordPress 附带各种提要。在本教程中,如果满足以下条件,我们将使用 http://example.com/?feed=rss2 或 http://example.com/feed/ 上提供的 RSS 2.0 feed您使用永久链接。此提要是一个简单的 XML 文档,结构如下:
'
<?xml version="1.0" encoding="UTF-8"?>
<rss version="2.0"
  <!-- these are the namespaces -->
  xmlns:content="http://purl.org/rss/1.0/modules/content/"
  xmlns:wfw="http://wellformedweb.org/CommentAPI/"
  xmlns:dc="http://purl.org/dc/elements/1.1/"
  xmlns:atom="http://www.w3.org/2005/Atom"
  xmlns:sy="http://purl.org/rss/1.0/modules/syndication/"
  xmlns:slash="http://purl.org/rss/1.0/modules/slash/"
>

	<channel>
		<!-- this is the head -->
		<title>Your Blog Title</title>
		<atom:link href="http://your-site-url.com/feed" rel="self" type="application/rss+xml" />
		<link>http://your-site-url.com</link>
		<description>your Blog Description</description>
		<lastBuildDate>Thu, 27 Sep 2012 18:30:06 +0000</lastBuildDate>
		<language>en-US</language>
		<sy:updatePeriod>hourly</sy:updatePeriod>
		<sy:updateFrequency>1</sy:updateFrequency>
		<generator>http://wordpress.org/?v=3.4.2</generator>

		<!-- this is the first post -->
		<item>
			<title>Post 1 Title</title>
			<link>http://your-site-url.com/post-1-slug</link>
			<comments>http://your-site-url.com/post-1-slug#comments</comments>
			<pubDate>Tue, 15 May 2012 13:47:12 +0000</pubDate>
			<dc:creator>John Doe</dc:creator>
			<category><![CDATA[Category 1]]></category>
			<guid isPermaLink="false">http://your-site-url.com/?p=1</guid>
			<description><![CDATA[Aliquam rutrum placerat aliquet. Maecenas congue felis erat]]></description>
			<content:encoded><![CDATA[<p>Aliquam rutrum placerat aliquet. Maecenas congue felis erat.</p>]]></content:encoded>
			<wfw:commentRss>http://your-site-url.com/post-1-slug/feed</wfw:commentRss>
			<slash:comments>0</slash:comments>
		</item>

		<!-- this is the second post -->
		<item>
			<title>Post 2 Title</title>
			<link>http://your-site-url.com/post-2-slug</link>
			<comments>http://your-site-url.com/post-2-slug#comments</comments>
			<pubDate>Tue, 15 May 2012 13:37:56 +0000</pubDate>
			<dc:creator>John Doe</dc:creator>
			<category><![CDATA[Category 1]]></category>
			<category><![CDATA[Category 2]]></category>
			<guid isPermaLink="false">http://your-site-url.com/?p=2</guid>
			<description><![CDATA[Aliquam rutrum placerat aliquet.]]></description>
			<content:encoded><![CDATA[<p>Aliquam rutrum placerat aliquet</p>]]></content:encoded>
			<wfw:commentRss>http://your-site-url.com/post-2-slug/feed</wfw:commentRss>
			<slash:comments>0</slash:comments>
		</item>
	</channel>

</rss>
如您所见,每个
-
-
是帖子固定链接 -
-
-
-
-
第 2 步自定义 Flipboard 的 RSS 源
根据 Flipboard 技术要求,可以增强内容。
通过在文章标记中提供额外的语义,添加指定引文、幻灯片和其他设计元素的功能
这些附加语义是:
- 标题和副标题
- 引用
- 图像、视频和音频资源
- 幻灯片
- 地理信息
我们可以通过插件在 RSS Feed 中实现这些语义。如前所述,WordPress 提供了特定的 Hook,允许您修改默认的 RSS Feed 结构:
-
rss2_ns- 允许在根 XML 元素内添加新的命名空间; -
rss2_head- 允许在 feed 标头中添加标签; -
the_content_feed- 允许修改 Feed 中显示的每个帖子的内容; -
rss2_item- 允许向每个
创建一个名为flipboard-feed.php的新文件,打开您最喜欢的文本编辑器并粘贴此插件标头:
'
<?php
/*
 * Plugin Name:   Flipboard RSS Feed
 * Plugin URI:    http://www.studio404.it
 * Description:   A plugin to customize the default RSS Feed according to Flipboard technical specifications.
 * Version:       1.0
 * Author:        Claudio Simeone
 * Author URI:    http://www.studio404.it
 */
?>
复制 /wp-content/plugins/ 目录中的文件并从插件管理页面激活它。
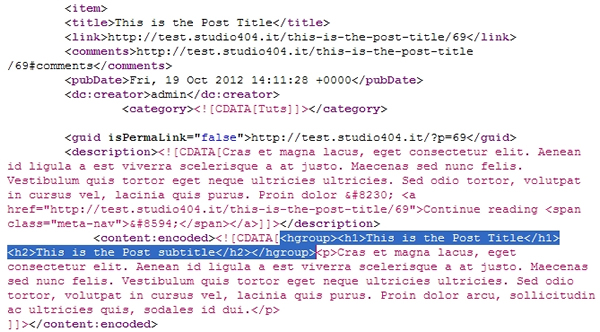
标题和副标题
如果您想在帖子内容之前添加标题和副标题,则必须添加如下内容:
'
<hgroup>
	<h1>Title of the Post</h1>
	<h2>This is the Post subtitle</h2>
</hgroup>
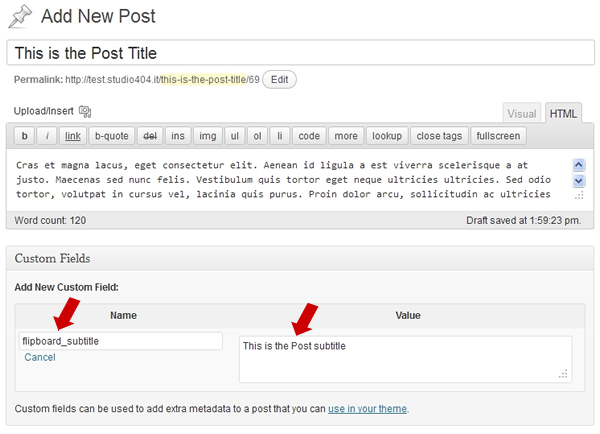
您也可以在文本编辑器中手动将其添加到帖子内容中,但这不是最佳解决方案,因为这些标签也会显示在您的网站上(除非您不隐藏 hgroup 元素通过 CSS 样式)。因此,要自动实现此目的并且仅在 RSS 源中,最好使用 元素的帖子标题和 副标题的自定义字段.
在编辑帖子页面中,添加 flipboard_subtitle 自定义字段。
将这些行添加到我们的 Flipboard RSS Feed 插件中:
'
add_filter( 'the_content_feed', 'flipboard_title_and_subtitle' );

function flipboard_title_and_subtitle( $content ) {
	global $post;
	$post_subtitle = get_post_meta( $post->ID, 'flipboard_subtitle', TRUE );
	// add hgroup only if the Custom Field is set
	if ( $post_subtitle ) {
		$hgroup = '<hgroup><h1>' . $post->post_title . '</h1>';
		$hgroup .= '<h2>' . $post_subtitle . '</h2></hgroup>';
		return $hgroup . $content;
	} else {
		return $content;
	}
}
现在,如果您发布帖子并刷新 RSS Feed 页面源,您将在帖子内容之前看到 hgroup 标记。
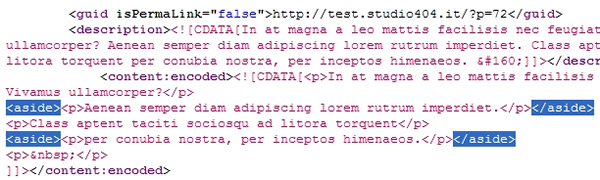
引用
对于拉引号,您可以在帖子内容中使用 标记来指出文本的某些部分。我们可以利用该插件将 替换为 标签。

将这些行添加到我们的 Flipboard RSS Feed 插件中:
'
add_filter( 'the_content_feed', 'flipboard_pull_quotes' );

function flipboard_pull_quotes( $content ) {
	// replace blockquote tag with aside
	return str_replace( 'blockquote>', 'aside>', $content );
}
重新加载您的 RSS Feed 页面源代码,您将看到新的 标记。
图片
对于所有这些元素,我们将遵循 Flipboard 建议的另一种方法:我们将向
Media RSS 是一种 RSS 扩展,可增强 RSS 源中多媒体文件的发布。由于其特殊元素,图像、视频和音频文件及其元数据可以包含到 RSS 源中。
在我们的例子中,我们将使用其中主要的一个:
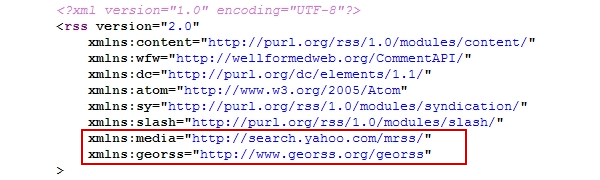
此外,我们还需要GeoRSS扩展来支持地理信息,因此我们必须向RSS Feed添加正确的命名空间才能使其有效。
将这些行添加到我们的 Flipboard RSS Feed 插件中:
'
add_filter( 'rss2_ns', 'flipboard_namespace' );

function flipboard_namespace() {
	echo 'xmlns:media="http://search.yahoo.com/mrss/"
	xmlns:georss="http://www.georss.org/georss"';
}
结果将是:
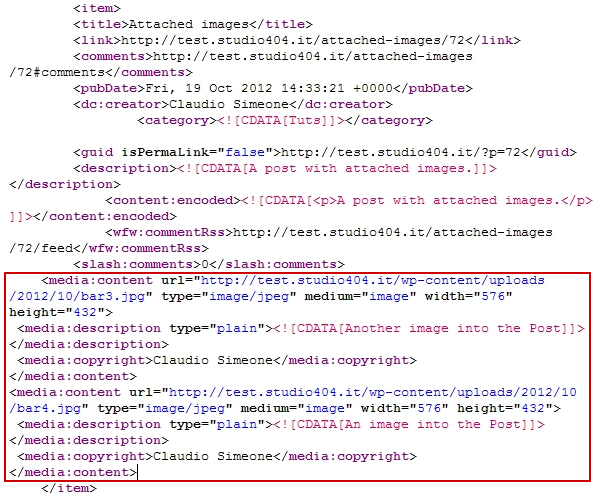
现在我们想要将帖子中附加的所有图像添加到 RSS 提要中。我们必须做这样的事情:
'
<item>
	<!-- Full item markup omitted for brevity -->
	<media:content type="image/jpeg" media="image" width="900" height="600" url="http://media.example.com/kitten-landscape.jpg">
		<media:description type="plain">An adorable kitten</media:description>
		<media:copyright>Carl Carlson</media:copyright>
	</media:content>
</item>
现在,我们将在 WordPress Feed 中实现这一点。撰写帖子并附加一些图像(请注意,图像的最小尺寸必须至少为 400 像素):
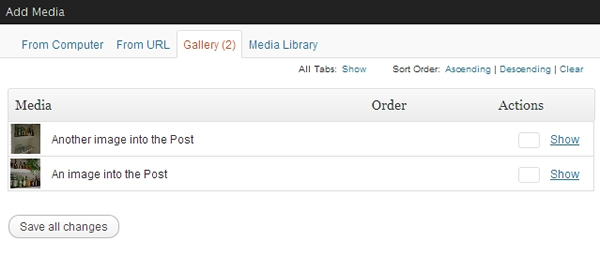
发布帖子,然后将这些行添加到我们的 Flipboard RSS Feed 插件中:
'
add_filter( 'rss2_item', 'flipboard_attached_images' );

function flipboard_attached_images() {
	global $post;
	$attachments = get_posts( array(
		'post_type' => 'attachment',
		'post_mime_type' => 'image',
		'posts_per_page' => -1,
		'post_parent' => $post->ID,
		'exclude' => get_post_thumbnail_id()
	) );
	if ( $attachments ) {
		foreach ( $attachments as $att ) {
			$img_attr = wp_get_attachment_image_src( $att->ID, 'full' );
			?>
			<media:content url="<?php echo $img_attr[0]; ?>" type="<?php echo $att->post_mime_type; ?>" medium="image" width="<?php echo $img_attr[1]; ?>" height="<?php echo $img_attr[2]; ?>">
				<media:description type="plain"><![CDATA[<?php echo $att->post_title; ?>]]></media:description>
				<media:copyright><?php echo get_the_author(); ?></media:copyright>
			</media:content>
			<?php
		}
	}
}
重新加载您的 RSS Feed 页面源代码,您将看到每个附加图像的
关于
视频
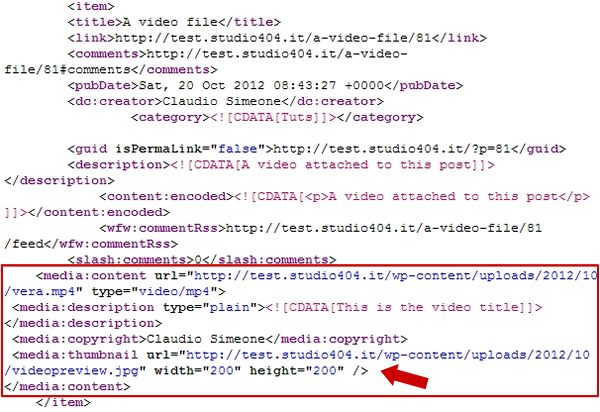
对于视频文件 Flipboard 建议使用以下代码:
'
<media:content url="http://www.example.com/lisa-saxophone.mp4" type="video/mp4">
	<media:description type="plain">Lisa plays the saxophone</media:description>
	<media:thumbnail url="http://www.example.com/lisa-saxophone.jpg" width="200" height="200" />
	<media:copyright>Carl Carlson</media:copyright>
</media:content>
这里我们有一个新的子元素:
- 添加新帖子并附加一个或多个视频/音频
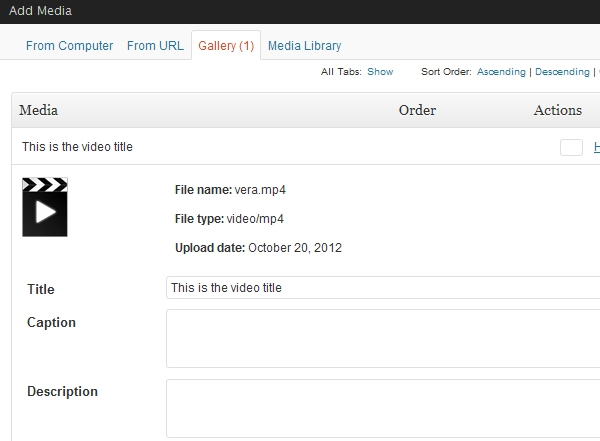
- 在媒体库页面中,上传预览图像,记下图像尺寸并复制图像文件网址
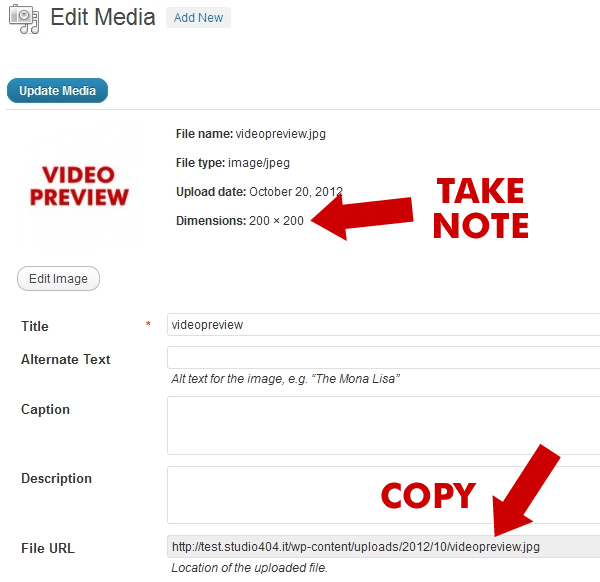
- 在媒体库中找到视频,对其进行编辑并将图像 URL 粘贴到说明字段中,还添加宽度和图像的高度,每个由管道字符“
|”分隔。为了设置正确的图像尺寸,这是必要的。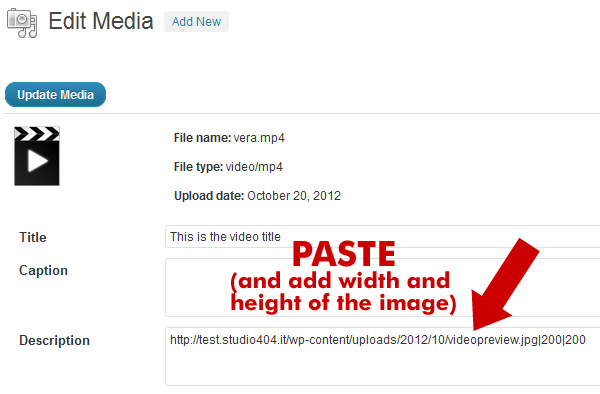
现在是时候将视频放入我们的 RSS 源中了。将这些行添加到我们的 Flipboard RSS Feed 插件中:
'
add_filter( 'rss2_item', 'flipboard_attached_videos' );

function flipboard_attached_videos() {
	global $post;
	$attachments = get_posts( array(
		'post_type' => 'attachment',
		'post_mime_type' => 'video',
		'posts_per_page' => -1,
		'post_parent' => $post->ID,
		'exclude' => get_post_thumbnail_id()
	) );
	if ( $attachments ) {
		foreach ( $attachments as $att ) {
			$video_url = wp_get_attachment_url( $att->ID );
			$parts = explode( '|', $att->post_content );
			?>
			<media:content url="<?php echo $video_url; ?>" type="<?php echo $att->post_mime_type; ?>">
				<media:description type="plain"><![CDATA[<?php echo $att->post_title; ?>]]></media:description>
				<media:copyright><?php echo get_the_author(); ?></media:copyright>
				<media:thumbnail url="<?php echo $parts[0]; ?>" width="<?php echo $parts[1]; ?>" height="<?php echo $parts[2]; ?>" />
			</media:content>
			<?php
		}
	}
}
这是最终结果:
音频
音频文件的 Fliboard 代码是:
'
<media:content url="http://www.example.com/bartman.mp3" fileSize="1000" type="audio/mpeg" >
	<media:description type="plain">Lisa plays the saxophone</media:description>
	<media:thumbnail url="http://www.example.com/lisa-saxophone.jpg" width="200" height="200" />
	<media:copyright>Carl Carlson</media:copyright>
</media:content>
如您所见,它与视频基本相同:因此要将图像预览附加到音频文件,我们可以使用与视频相同的方法。
因此,在我们的插件中添加这些行:
'
add_filter( 'rss2_item', 'flipboard_attached_audio' );

function flipboard_attached_audio() {
	global $post;
	$attachments = get_posts( array(
		'post_type' => 'attachment',
		'post_mime_type' => 'audio',
		'posts_per_page' => -1,
		'post_parent' => $post->ID,
		'exclude' => get_post_thumbnail_id()
	) );
	if ( $attachments ) {
		foreach ( $attachments as $att ) {
			$audio_url = wp_get_attachment_url( $att->ID );
			$parts = explode( '|', $att->post_content );
			$headers = get_headers( $audio_url, 1 );
			$filesize = $headers['Content-Length'];
			?>
			<media:content url="<?php echo $audio_url; ?>" fileSize="<?php echo $filesize; ?>" type="<?php echo $att->post_mime_type; ?>">
				<media:description type="plain"><![CDATA[<?php echo $att->post_title; ?>]]></media:description>
				<media:copyright><?php echo get_the_author(); ?></media:copyright>
				<media:thumbnail url="<?php echo $parts[0]; ?>" width="<?php echo $parts[1]; ?>" height="<?php echo $parts[2]; ?>" />
			</media:content>
			<?php
		}
	}
}
幻灯片
要以幻灯片格式添加附加到帖子的所有图像,我们必须将一部分 HTML 代码添加到 RSS Feed 帖子内容中:
'
<section class="fl-slideshow">
	<h1>My favorite animals</h1>
	<figure>
		<img src="puppy.jpg" width="1200" height="900">
		<figcaption>Puppies are cute</figcaption>
	</figure>
	<figure>
		<img src="kitten.jpg" width="900" height="1200">
		<figcaption>Kittens are too</figcaption>
	</figure>
	<figure>
		<img src="lamb.jpg" width="900" height="900">
		<figcaption>And baby sheep grow into ewe</figcaption>
	</figure>
</section>
在我们的插件中添加这些行:
'
add_filter( 'the_content_feed', 'flipboard_slideshow' );

function flipboard_slideshow( $content ) {
	global $post;
	$attachments = get_posts( array(
		'post_type' => 'attachment',
		'post_mime_type' => 'image',
		'posts_per_page' => -1,
		'post_parent' => $post->ID,
		'exclude'     => get_post_thumbnail_id()
	) );
	if ( $attachments ) {
		$slide = '<section class="fl-slideshow"><h1>' . $post->post_title . '</h1>';
		foreach ( $attachments as $att ) {
			$img_attr = wp_get_attachment_image_src( $att->ID, 'full' );
			$slide .= '<figure>
				<img src="' . $img_attr[0] . '" width="' . $img_attr[1] . '" height="' . $img_attr[2] . '">
				<figcaption>' . $att->post_title . '</figcaption>
			</figure>';
		}
		$slide .= '</section>';
		return $content . $slide;
	} else {
		return $content;
	}
}
这就是结果:
地理信息
要显示地理信息,我们可以使用自定义字段,就像我们对 hgroup 副标题所做的那样。
因此,在“编辑帖子”页面中,添加 flipboard_geo 自定义字段,并按如下格式设置值:45.256 -71.92(GeoRSS 文档中提供了受支持标签的完整列表)。
将这些行添加到我们的 Flipboard RSS Feed 插件中:
'
add_filter( 'the_content_feed', 'flipboard_geo' );

function flipboard_geo( $content ) {
	global $post;
	$flipboard_geo = get_post_meta( $post->ID, 'flipboard_geo', TRUE );
	if ( $flipboard_geo ) {
		$geo = '<georss:poin>' . $flipboard_geo . '</georss:point>';
		return $content . $geo;
	} else {
		return $content;
	}
}
将您的 Feed 提交到 Flipboard
一旦 RSS Feed 准备就绪,您就可以请求 Flipboard 将其包含在其新闻来源中:您必须通过电子邮件联系 Flipboard 工作人员,包括您的 RSS Feed URL、Twitter、Facebook 和网站详细信息。工作人员将审核所有信息,并会在 5 个工作日内通知您。
第 3 步为 iTunes 上的播客自定义 RSS Feed
要在 Apple iTunes 上发布我们的音频或视频播客,我们需要通过新插件根据 iTunes 技术规范格式化 RSS Feed:
创建一个名为 itunes-feed.php 的新文件,打开您最喜欢的文本编辑器并粘贴以下内容:
'
<?php
/*
 * Plugin Name:   iTunes RSS Feed
 * Plugin URI:    http://www.studio404.it
 * Description:   A plugin to customize the default RSS Feed according to iTunes technical specifications.
 * Version:       1.0
 * Author:        Claudio Simeone
 * Author URI:    http://www.studio404.it
 */
?>
复制 /wp-content/plugins/ 目录中的文件并在插件管理页面中激活它。
iTunes 命名空间
要添加 iTunes 命名空间并支持 iTunes 特定元标记,我们可以使用 rss2_ns 过滤器:
add_filter( 'rss2_ns', 'itunes_namespace' );

// Add namespace
function itunes_namespace() {
	echo 'xmlns:itunes="http://www.itunes.com/dtds/podcast-1.0.dtd"';
}
iTunes 头部标签
下一步是添加各种信息,以帮助 iTunes 更好地对商店中的提要进行分类,并显示有关您的播客频道的详细信息。
我们可以通过 rss2_head 过滤器添加所有这些信息:
add_filter( 'rss2_head', 'itunes_head' );

function itunes_head() {
	?>
	<itunes:subtitle>A show about everything</itunes:subtitle>
	<itunes:author>John Doe</itunes:author>
	<itunes:summary>All About Everything is a show about everything...</itunes:summary>
	<itunes:owner>
		<itunes:name>John Doe</itunes:name>
		<itunes:email>john.doe@example.com</itunes:email>
	</itunes:owner>
	<itunes:image href="https://www.php.cn/link/4c9c3070235a7af934be4e46215c0cbc" />
	<itunes:category text="Technology">
		<itunes:category text="Gadgets"/>
	</itunes:category>
	<?php
}
为了本教程的简洁,该示例是静态的。您可以在插件源代码中手动修改所有信息。如果您希望使其动态化,您可以创建一个选项页来处理所有这些信息(另请参阅:Ozh 的使用 register_setting() 处理 WordPress 2.8 中的插件选项)。
iTunes 帖子标签
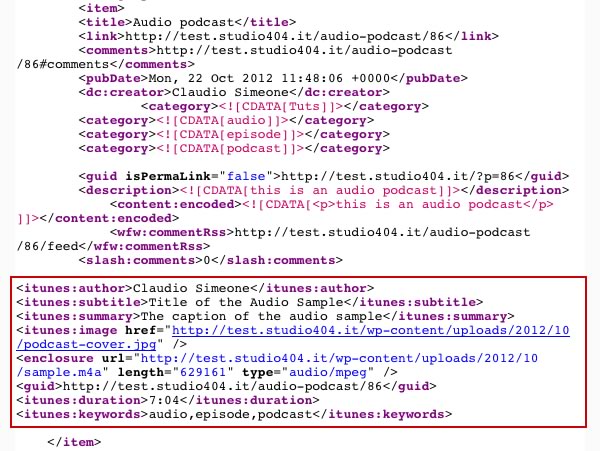
对于每篇帖子,iTunes 都会要求添加一些额外的标签:
'
<itunes:author>John Doe</itunes:author>
<itunes:subtitle>A short primer on table spices</itunes:subtitle>
<itunes:summary>This week we talk about salt and pepper shakers...</itunes:summary>
<itunes:image href="http://example.com/podcasts/everything/AllAboutEverything/Episode1.jpg" />
<enclosure url="http://example.com/podcasts/everything/AllAboutEverythingEpisode3.m4a" length="8727310" type="audio/x-m4a" />
<guid>http://example.com/podcasts/archive/aae20050615.m4a</guid>
<itunes:duration>7:04</itunes:duration>
<itunes:keywords>salt, pepper, shaker, exciting</itunes:keywords>
我们可以像这样处理其中一些信息:
- 作者:我们将使用帖子作者
- 副标题:我们将使用帖子的附件标题
- 摘要:我们将使用附件标题
- 持续时间:我们将使用附件说明
- 关键字:我们将使用帖子标签
写一篇新文章,添加标题、一些内容和一些标签。然后,将音频文件附加到帖子中。
文件上传后,添加其他信息:标题、说明文字,并使用说明字段指定持续时间。
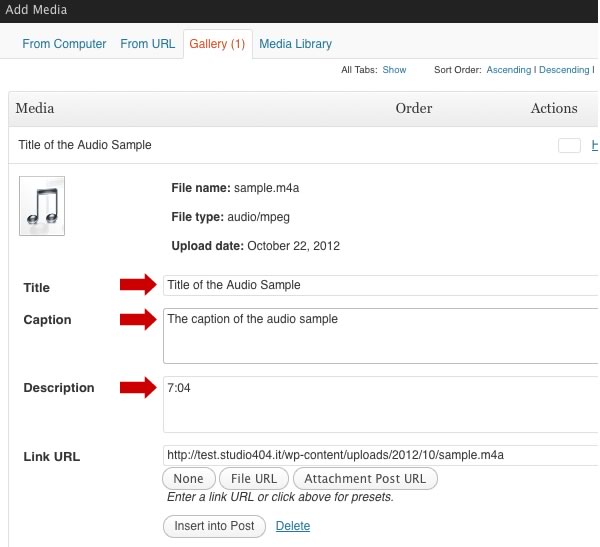
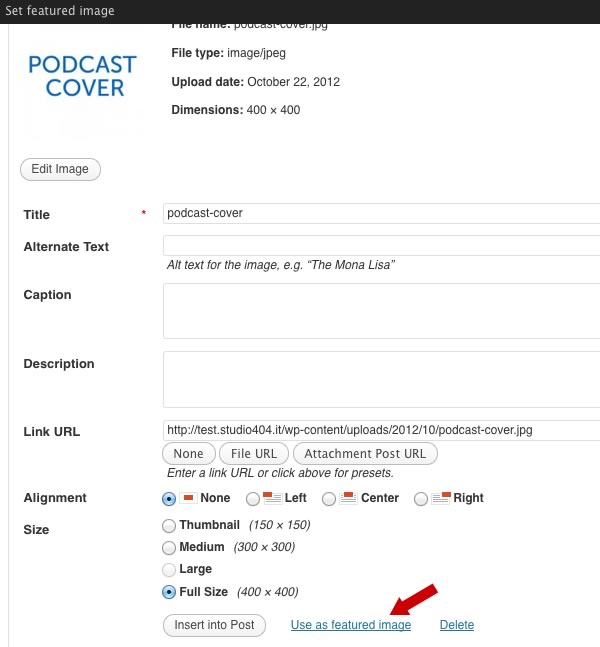
将精选图片添加到帖子中,最后发布。
现在,在我们的 itunes-feed.php 插件中添加以下行:
'
// add support for Post Thumbnails we will use for podcast covers
add_theme_support( 'post-thumbnails' );

// iTunes prefers square .jpg images that are at least 400 x 400 pixels
add_image_size( 'itunes-cover', 400, 400, true );

function itunes_attached_audio() {
	global $post;
	$attachments = get_posts( array(
		'post_type' => 'attachment',
		'post_mime_type' => 'audio', // if you use videos, change here
		'posts_per_page' => -1,
		'post_parent' => $post->ID,
		'exclude' => get_post_thumbnail_id()
	) );

	// use the post tags for itunes:keywords
	$itunes_keywords_arr = get_the_tags();
	if ( $itunes_keywords_arr ) {
		foreach( $itunes_keywords_arr as $tag ) {
			$itunes_keywords .= $tag->name . ',';
		}
		$itunes_keywords = substr_replace( trim( $itunes_keywords ), '', -1 );
	}

	// use the post thumb for itunes:image
	$post_thumbnail_id = get_post_thumbnail_id( $post->ID );
	$itunes_image_arr = wp_get_attachment_image_src( $post_thumbnail_id, 'itunes-cover' );

	if ( $attachments ) {
		foreach ( $attachments as $att ) {
			$audio_url = wp_get_attachment_url( $att->ID );
			$parts = explode( '|', $att->post_content );
			$headers = get_headers( $audio_url, 1 );
			$filesize = $headers['Content-Length'];
			?>
			<itunes:author><?php echo get_the_author(); ?></itunes:author>
			<itunes:subtitle><?php echo $att->post_title; ?></itunes:subtitle>
			<itunes:summary><?php echo $att->post_excerpt; ?></itunes:summary>
			<itunes:image href="<?php echo $itunes_image_arr[0]; ?>" />
			<enclosure url="<?php echo $audio_url; ?>" length="<?php echo $filesize; ?>" type="<?php echo $att->post_mime_type; ?>" />
			<guid><?php the_permalink(); ?></guid>
			<itunes:duration><?php echo $att->post_content; ?></itunes:duration>
			<itunes:keywords><?php echo $itunes_keywords; ?></itunes:keywords>
			<?php
		}
	}
}
最后,发布帖子并重新加载 RSS Feed 页面源。
结论
虽然本教程仅涵盖两个主要平台,但借助 WordPress Hooks,可以自定义默认的 RSS Feed 并使其适用于其他外部 Web 应用程序。对于每篇帖子,您可以使用新的 RSS 扩展附加附加信息,也可以通过提供附加 HTML 代码来增强帖子内容,以满足您要用于发布内容的所有平台的要求。
参考文献
- Apple iTunes 示例 Feed
- GeoRSS-简单文档
- 通过 RSS Feed 在 Flipboard 上发布内容
-
WordPress 挂钩和过滤器
- WordPress 插件 API
- 关于在帖子和自定义帖子类型管理屏幕中添加自定义列中的 WordPress 挂钩
- WordPress 操作和过滤器初学者指南


