如果您一直在关注本系列,您应该熟悉我们在后端为自定义付款方式设置的文件结构类型。如果您还没有阅读过本系列的前面部分,我强烈建议您在继续阅读本系列之前先阅读它们。
我们也将为前端部分使用类似的文件设置。
控制器设置
继续并在 catalog/controller/ payment/custom.php 创建控制器文件。将以下内容粘贴到新创建的控制器文件 custom.php 中。
<?php
class ControllerPaymentCustom extends Controller {
  protected function index() {
    $this->language->load('payment/custom');
    $this->data['button_confirm'] = $this->language->get('button_confirm');
    $this->data['action'] = 'https://yourpaymentgatewayurl';

    $this->load->model('checkout/order');
    $order_info = $this->model_checkout_order->getOrder($this->session->data['order_id']);

    if ($order_info) {
      $this->data['text_config_one'] = trim($this->config->get('text_config_one'));
      $this->data['text_config_two'] = trim($this->config->get('text_config_two'));
      $this->data['orderid'] = date('His') . $this->session->data['order_id'];
      $this->data['callbackurl'] = $this->url->link('payment/custom/callback');
      $this->data['orderdate'] = date('YmdHis');
      $this->data['currency'] = $order_info['currency_code'];
      $this->data['orderamount'] = $this->currency->format($order_info['total'], $this->data['currency'] , false, false);
      $this->data['billemail'] = $order_info['email'];
      $this->data['billphone'] = html_entity_decode($order_info['telephone'], ENT_QUOTES, 'UTF-8');
      $this->data['billaddress'] = html_entity_decode($order_info['payment_address_1'], ENT_QUOTES, 'UTF-8');
      $this->data['billcountry'] = html_entity_decode($order_info['payment_iso_code_2'], ENT_QUOTES, 'UTF-8');
      $this->data['billprovince'] = html_entity_decode($order_info['payment_zone'], ENT_QUOTES, 'UTF-8');;
      $this->data['billcity'] = html_entity_decode($order_info['payment_city'], ENT_QUOTES, 'UTF-8');
      $this->data['billpost'] = html_entity_decode($order_info['payment_postcode'], ENT_QUOTES, 'UTF-8');
      $this->data['deliveryname'] = html_entity_decode($order_info['shipping_firstname'] . $order_info['shipping_lastname'], ENT_QUOTES, 'UTF-8');
      $this->data['deliveryaddress'] = html_entity_decode($order_info['shipping_address_1'], ENT_QUOTES, 'UTF-8');
      $this->data['deliverycity'] = html_entity_decode($order_info['shipping_city'], ENT_QUOTES, 'UTF-8');
      $this->data['deliverycountry'] = html_entity_decode($order_info['shipping_iso_code_2'], ENT_QUOTES, 'UTF-8');
      $this->data['deliveryprovince'] = html_entity_decode($order_info['shipping_zone'], ENT_QUOTES, 'UTF-8');
      $this->data['deliveryemail'] = $order_info['email'];
      $this->data['deliveryphone'] = html_entity_decode($order_info['telephone'], ENT_QUOTES, 'UTF-8');
      $this->data['deliverypost'] = html_entity_decode($order_info['shipping_postcode'], ENT_QUOTES, 'UTF-8');

      if (file_exists(DIR_TEMPLATE . $this->config->get('config_template') . '/template/payment/custom.tpl')){
        $this->template = $this->config->get('config_template') . '/template/payment/custom.tpl';
      } else {
        $this->template = 'default/template/payment/custom.tpl';
      }

      $this->render();
    }
  }

  public function callback() {
    if (isset($this->request->post['orderid'])) {
      $order_id = trim(substr(($this->request->post['orderid']), 6));
    } else {
      die('Illegal Access');
    }

    $this->load->model('checkout/order');
    $order_info = $this->model_checkout_order->getOrder($order_id);

    if ($order_info) {
      $data = array_merge($this->request->post,$this->request->get);

      //payment was made successfully
      if ($data['status'] == 'Y' || $data['status'] == 'y') {
        // update the order status accordingly
      }
    }
  }
}
?>
如您所见,有两种不同的方法。 index 方法将负责在表单提交到第三方支付网关时设置数据,而 callback 方法用于处理来自第三方支付网关的响应数据支付网关。话虽如此,如果您的支付网关需要,您可以定义更多方法。在此示例中,我们使流程尽可能简单。
让我们详细了解每个部分。我们将从 index 方法开始。
首先,我们加载了语言文件并设置了确认按钮的值。我们还设置了 action 属性,该属性将由付款提交表单使用。您应该根据您的支付网关更改此设置。
$this->language->load('payment/custom');
$this->data['button_confirm'] = $this->language->get('button_confirm');
$this->data['action'] = 'https://yourpaymentgatewayurl';
接下来,我们从用户的活动会话中加载订单信息。
'$this->load->model('checkout/order');
$order_info = $this->model_checkout_order->getOrder($this->session->data['order_id']);
如果订单信息可用,我们将继续设置隐藏变量的数据,这些数据将用于将表单提交到支付网关 URL。如果您密切关注代码,您会发现我们还使用了自定义参数 text_config_one 和 text_config_two,我们在管理配置表单中设置了这些参数本系列的前一部分。
这里需要注意的另一个重要变量是 callbackurl,它保存支付网关在付款过程后将用户重定向回我们商店所使用的 URL。是的,查看 URL payment/custom/callback 应表明它将调用 callback 方法,正如我们将在此刻看到的那样。
$this->data['text_config_one'] = trim($this->config->get('text_config_one'));
$this->data['text_config_two'] = trim($this->config->get('text_config_two'));
$this->data['orderid'] = date('His') . $this->session->data['order_id'];
$this->data['callbackurl'] = $this->url->link('payment/custom/callback');
$this->data['orderdate'] = date('YmdHis');
$this->data['currency'] = $order_info['currency_code'];
$this->data['orderamount'] = $this->currency->format($order_info['total'], $this->data['currency'] , false, false);
$this->data['billemail'] = $order_info['email'];
$this->data['billphone'] = html_entity_decode($order_info['telephone'], ENT_QUOTES, 'UTF-8');
$this->data['billaddress'] = html_entity_decode($order_info['payment_address_1'], ENT_QUOTES, 'UTF-8');
$this->data['billcountry'] = html_entity_decode($order_info['payment_iso_code_2'], ENT_QUOTES, 'UTF-8');
$this->data['billprovince'] = html_entity_decode($order_info['payment_zone'], ENT_QUOTES, 'UTF-8');;
$this->data['billcity'] = html_entity_decode($order_info['payment_city'], ENT_QUOTES, 'UTF-8');
$this->data['billpost'] = html_entity_decode($order_info['payment_postcode'], ENT_QUOTES, 'UTF-8');
$this->data['deliveryname'] = html_entity_decode($order_info['shipping_firstname'] . $order_info['shipping_lastname'], ENT_QUOTES, 'UTF-8');
$this->data['deliveryaddress'] = html_entity_decode($order_info['shipping_address_1'], ENT_QUOTES, 'UTF-8');
$this->data['deliverycity'] = html_entity_decode($order_info['shipping_city'], ENT_QUOTES, 'UTF-8');
$this->data['deliverycountry'] = html_entity_decode($order_info['shipping_iso_code_2'], ENT_QUOTES, 'UTF-8');
$this->data['deliveryprovince'] = html_entity_decode($order_info['shipping_zone'], ENT_QUOTES, 'UTF-8');
$this->data['deliveryemail'] = $order_info['email'];
$this->data['deliveryphone'] = html_entity_decode($order_info['telephone'], ENT_QUOTES, 'UTF-8');
$this->data['deliverypost'] = html_entity_decode($order_info['shipping_postcode'], ENT_QUOTES, 'UTF-8');
最后,我们分配自定义模板文件 custom.tpl 并渲染视图。
if (file_exists(DIR_TEMPLATE . $this->config->get('config_template') . '/template/payment/custom.tpl')){
  $this->template = $this->config->get('config_template') . '/template/payment/custom.tpl';
} else {
  $this->template = 'default/template/payment/custom.tpl';
}

$this->render();
让我们回顾一下 callback 方法的代码。当用户从支付网关站点返回商店时,将调用此方法。
首先,我们在继续操作之前检查 orderid 变量是否可用。如果不可用,我们将停止进一步处理。
if (isset($this->request->post['orderid'])) {
  $order_id = trim(substr(($this->request->post['orderid']), 6));
} else {
  die('Illegal Access');
}
接下来,我们从数据库加载订单信息。最后,我们将检查支付网关响应中是否有 success 指示器。如果是这样,我们将继续相应地更新订单状态信息。
$this->load->model('checkout/order');
$order_info = $this->model_checkout_order->getOrder($order_id);

if ($order_info) {
  $data = array_merge($this->request->post,$this->request->get);

  //payment was made succ
  if ($data['status'] == 'Y' || $data['status'] == 'y') {
    // update the order status accordingly
  }
}
这就是控制器设置。很简单,不是吗?
传统模型
您可能知道,OpenCart 有自己的一套处理商店内部运作的惯例和标准。支付方式检测的模型设置就是这种情况。您只需按照约定进行设置,它就会被自动拾取。
继续并在 catalog/model/ payment/custom.php 创建模型文件。将以下内容粘贴到新创建的模型文件 custom.php 中。
<?php
class ModelPaymentCustom extends Model {
  public function getMethod($address, $total) {
    $this->load->language('payment/custom');

    $method_data = array(
      'code'     => 'custom',
      'title'    => $this->language->get('text_title'),
      'sort_order' => $this->config->get('custom_sort_order')
    );

    return $method_data;
  }
}
OpenCart 在结帐过程中列出有效付款方式时将使用此类。在此过程中,OpenCart 从后端收集有效支付方法的列表,并且对于每种方法,它将检查适当的模型类是否可用。仅当关联模型类可用时才会列出付款方式。
此设置中最重要的是 code 变量的值。在我们的例子中,我们将其定义为 custom,这意味着当您选择付款方式并按继续时,它将调用 payment/custom 内部 URL,最终为我们的支付网关设置表单。
简而言之,我们可以说它是前端支付方式检测和正常工作的强制文件。
语言和模板文件
现在,我们只需要创建语言并查看文件。继续并在 catalog/language/english/ payment/custom.php 创建语言文件。将以下内容粘贴到新创建的语言文件 custom.php 中。
<?php
$_['text_title'] = 'Custom Payment Method';
$_['button_confirm'] = 'Confirm Order';
?>
相当容易理解:我们刚刚设置了结账时将在前端使用的标签。
继续并在 catalog/view/theme/default/template/ payment/custom.tpl 创建模板文件。将以下内容粘贴到新创建的模板文件 custom.tpl 中。
<form action="<?php echo $action; ?>" method="post">
  <input type="hidden" name="text_config_one" value="<?php echo $text_config_one; ?>" />
  <input type="hidden" name="text_config_two" value="<?php echo $text_config_two; ?>" />
  <input type="hidden" name="orderid" value="<?php echo $orderid; ?>" />
  <input type="hidden" name="callbackurl" value="<?php echo $callbackurl; ?>" />
  <input type="hidden" name="orderdate" value="<?php echo $orderdate; ?>" />
  <input type="hidden" name="currency" value="<?php echo $currency; ?>" />
  <input type="hidden" name="orderamount" value="<?php echo $orderamount; ?>" />
  <input type="hidden" name="billemail" value="<?php echo $billemail; ?>" />
  <input type="hidden" name="billphone" value="<?php echo $billphone; ?>" />
  <input type="hidden" name="billaddress" value="<?php echo $billaddress; ?>" />
  <input type="hidden" name="billcountry" value="<?php echo $billcountry; ?>" />
  <input type="hidden" name="billprovince" value="<?php echo $billprovince; ?>" />
  <input type="hidden" name="billcity" value="<?php echo $billcity; ?>" />
  <input type="hidden" name="billpost" value="<?php echo $billpost; ?>" />
  <input type="hidden" name="deliveryname" value="<?php echo $deliveryname; ?>" />
  <input type="hidden" name="deliveryaddress" value="<?php echo $deliveryaddress; ?>" />
  <input type="hidden" name="deliverycity" value="<?php echo $deliverycity; ?>" />
  <input type="hidden" name="deliverycountry" value="<?php echo $deliverycountry; ?>" />
  <input type="hidden" name="deliveryprovince" value="<?php echo $deliveryprovince; ?>" />
  <input type="hidden" name="deliveryemail" value="<?php echo $deliveryemail; ?>" />
  <input type="hidden" name="deliveryphone" value="<?php echo $deliveryphone; ?>" />
  <input type="hidden" name="deliverypost" value="<?php echo $deliverypost; ?>" />

  <div class="buttons">
    <div class="right">
      <input type="submit" value="<?php echo $button_confirm; ?>" class="button" />
    </div>
  </div>
</form>
正如您可能已经猜到的,这是当用户单击确认订单按钮时将提交的表单。我们刚刚设置了隐藏变量及其值,这些变量先前在控制器的 index 方法中定义。
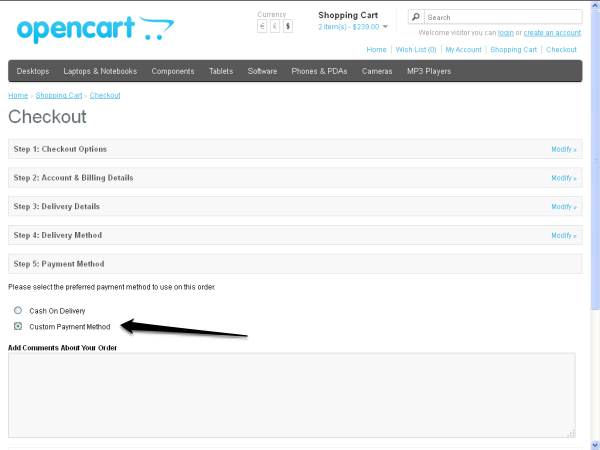
让我们看看前端的情况:
让我们快速浏览一下整个流程:
- 首先,您必须为付款方式设置模型文件,以便可以在第 5 步:付款方式标签中列出该模型文件。
- 接下来,当用户在第五个选项卡中选择自定义付款方式并点击继续按钮时,OpenCart 会在内部调用
payment/customURL,最终调用index方法并在第六个选项卡中呈现custom.tpl文件。
- 最后,当用户点击确认订单按钮时,表单将被提交,用户将被带到付款网关网站,付款流程将由此开始。付款过程完成后,由于
callbackurl隐藏变量,用户将被重定向回我们的网站。当然,如果一切按预期运行,订单状态将作为callback方法的一部分进行更新。
结论
在本系列中,我解释了如何通过创建您自己的付款方式模块来设置几乎所有付款方式。我希望您喜欢这个系列并学到一些有用的东西。
为任何框架创建自定义内容总是很有趣,不是吗?请记住,您随时可以使用下面的评论表提出评论和问题。


