本教程是 Envato Tuts+ 上“使用 PHP 构建您的初创公司”系列的一部分。在本系列中,我将使用我的 Meeting Planner 应用程序作为现实生活中的示例,指导您启动从概念到现实的初创公司。在此过程中的每一步,我都会将 Meeting Planner 代码作为开源示例发布,您可以从中学习。我还将解决出现的与初创公司相关的业务问题。
在本教程中,我将指导您实现 OAuth 与常见社交网络的集成,以使注册和重复使用更轻松、更高效。我将探索 Facebook、Google、Twitter 和 LinkedIn,我认为这些网络最适合 Meeting Planner 的目标用户。
Meeting Planner 的所有代码都是用 PHP 的 Yii2 框架编写的。如果您想了解有关 Yii2 的更多信息,请查看我们在 Envato Tuts+ 上的并行系列《使用 Yii2 编程》。
如果您尚未尝试会议策划器,请立即尝试安排您的第一次会议。今年它才真正开始融合在一起。最终,我能够使用 Yii2 的内置 AuthClient 支持来提供从上述所有网络的登录 - 因此您可以立即使用这些网络进行注册。
欢迎反馈。如果您有问题或主题建议,请在下面发表评论。您也可以通过 Twitter @reifman 联系我。
什么是 AuthClient?
AuthClient 是 Yii 的内置支持,支持您的应用程序使用 OpenID、OAuth 或 OAuth2 通过第三方服务进行身份验证。
如果您在 2015 年 6 月关注我的 Yii2 系列,您就会看到我使用 AuthClient 通过 OpenID 与 Google 集成,但该公司不久之后就终止了对该规范的支持。然后,在 12 月,我写了一个教程,使用 Yii2-User 扩展来添加 Google OAuth 支持——Yii2 框架还没有这个。然而,Yii2-User 并不能很好地与已经拥有面向用户的代码库的已建立代码库集成。但幸运的是,Yii2 框架添加了对 Google OAuth 的支持,一切都变得更加简单。
在本教程中,我将指导您使用新的 AuthClient 功能与各种流行的社交网络集成。 Yii 开箱即用,为以下客户端提供支持:
- 脸书
- GitHub
- 微软直播
- 推特
支持通过社交网络连接到 Meeting Planner 的另一个动机是,它允许人们出现并轻松地与我们分享他们的姓名和电子邮件。通过电子邮件和密码注册,我们实际上永远不会知道他们的名字。然而,与其他社交网络不同,Twitter 在获取用户电子邮件地址方面设置了明显的障碍,最终导致我暂时禁用它。
让我们开始代码集成。
在我们的应用程序中安装 AuthClient
首先,我们需要安装用于 OAuth 的 Yii 组件,即 Yii 的 AuthClient。
将 AuthClient 添加到 Composer
让我们将 AuthClient 库添加到composer.json:
' "minimum-stability": "stable",
"require": {
"php": ">=5.4.0",
"yiisoft/yii2": "*",
"yiisoft/yii2-bootstrap": "*",
"yiisoft/yii2-swiftmailer": "*",
"2amigos/yii2-google-maps-library": "*",
"2amigos/yii2-google-places-library": "*",
"stichoza/google-translate-php": "~2.0",
"2amigos/yii2-date-time-picker-widget": "*",
"yiisoft/yii2-jui": "*",
"cebe/yii2-gravatar": "*",
"kartik-v/yii2-widget-fileinput": "*",
"kartik-v/yii2-widget-switchinput": "*",
"yiisoft/yii2-imagine": "*",
"2amigos/yii2-resource-manager-component": "0.1.*",
"yiisoft/yii2-authclient": "~2.0.0"
},
然后,我们需要更新 Composer:
'sudo composer update
Password:
Loading composer repositories with package information
Updating dependencies (including require-dev)
- Updating 2amigos/yii2-date-time-picker-widget (0.1.0 => 0.1.1)
Checking out 572e2448ba1cd207b339dd5d117e3d1d23f0bbc3
- Installing yiisoft/yii2-authclient (2.0.2)
Loading from cache
Writing lock file
Generating autoload files
配置 AuthClient 支持
并且,我们需要将 AuthClient 配置设置添加到 frontendconfigmain.php 中的配置文件中。
为您希望支持的所有第三方服务添加数组元素(每个服务的详细信息可以在 AuthClient 指南中找到):
''components' => [
'authClientCollection' => [
'class' => 'yiiauthclientCollection',
'clients' => [
'facebook' => [
'class' => 'yiiauthclientclientsFacebook',
'clientId' => $config['oauth_fb_id'],
'clientSecret' => $config['oauth_fb_secret'],
],
'google' => [
'class' => 'yiiauthclientclientsGoogleOAuth',
'clientId' => $config['oauth_google_client_id'],
'clientSecret' => $config['oauth_google_client_secret'],
],
'linkedin' => [
'class' => 'yiiauthclientclientsLinkedIn',
'clientId' => $config['linkedin_client_id'],
'clientSecret' => $config['linkedin_client_secret'],
],
'twitter' => [
'class' => 'yiiauthclientclientsTwitter',
'consumerKey' => $config['oauth_twitter_key'],
'consumerSecret' => $config['oauth_twitter_secret'],
],
],
],
为了获取所有这些密钥和秘密的代码,您需要向每个社交网络注册您的应用程序。这通常非常耗时。
注册开发者应用程序
请跟随我的脚步,引导您完成一些网络的注册以及其他网络的一些更深层次的配置。
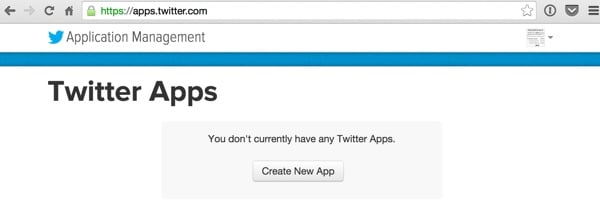
使用 Twitter 注册
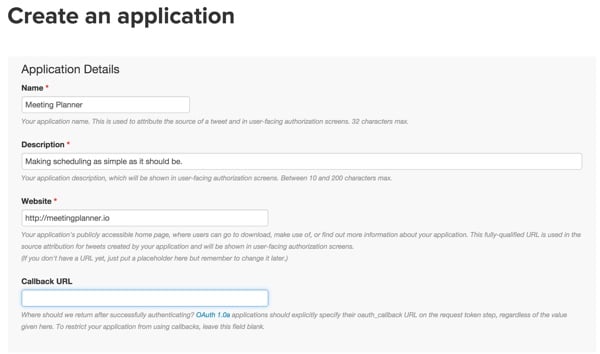
在 Twitter 应用程序仪表板上创建新的 Twitter 应用程序:
点击创建新应用 - 我发现回调 URL 是不必要的,但现在我使用占位符http://mydomain.com/user/security/auth。
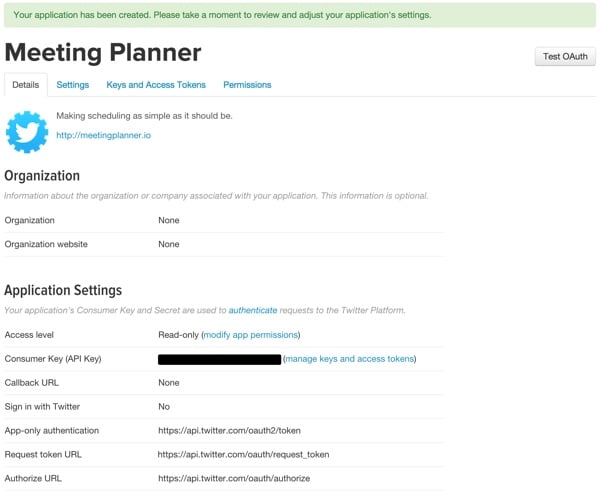
这是我们应用程序的新页面:
这是设置页面:

这是密钥和访问令牌页面。在这里,我们需要复制消费者密钥(API 密钥)和消费者秘密(API 秘密):
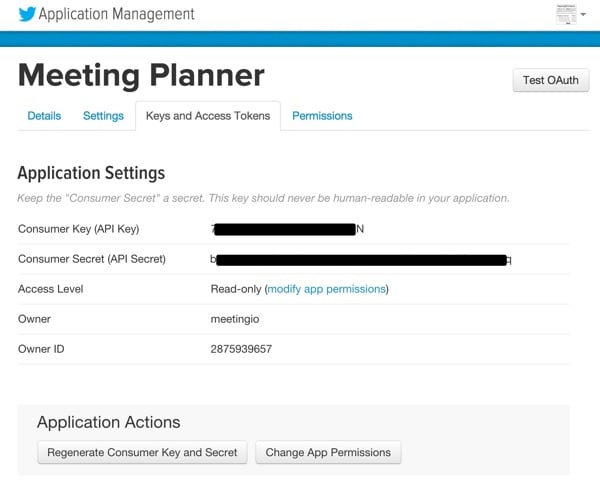
这些密钥位于我们的 mp.ini 文件中,该文件被读入 $config 变量上面为 Twitter 配置 AuthClient。
注册我们的 Facebook 应用程序
接下来,让我们访问 Facebook 开发者控制台并添加新应用:
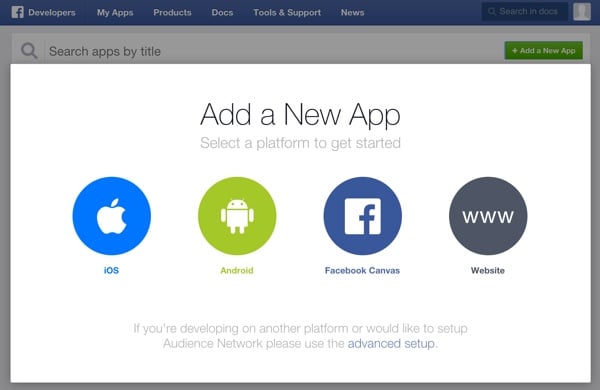
我们现在选择创建一个WWW网站应用:
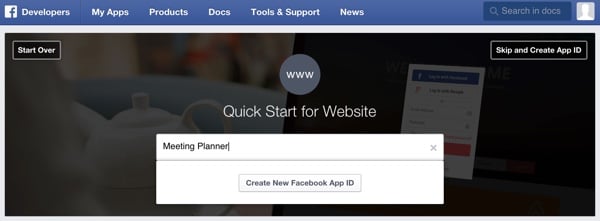
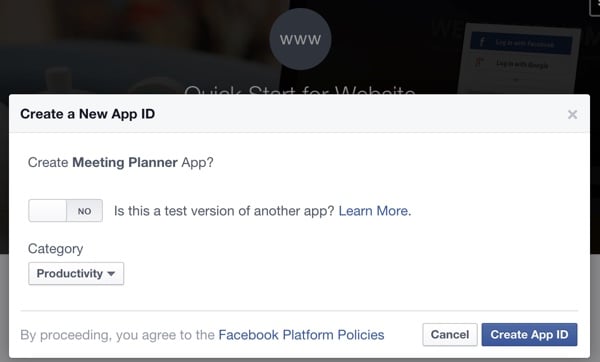
提供我们的应用程序名称:
并收集我们的新应用 ID:
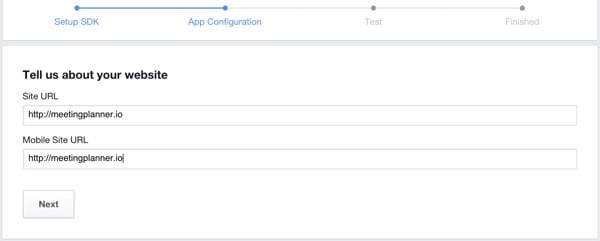
他们要求提供所有常规信息,例如网址:
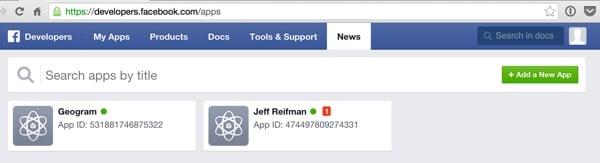
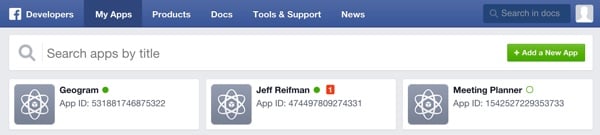
然后您可以在列表中找到我们的Meeting Planner应用程序:
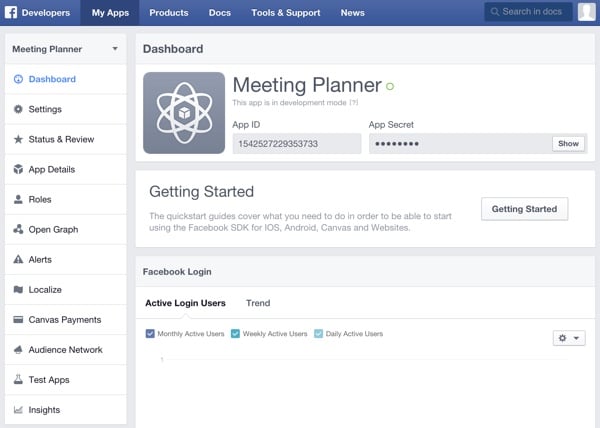
以下是您的应用程序的 Facebook 仪表板:
向 Google 注册
Google API 比 Twitter 和 Facebook 稍微复杂一些,因此用户体验有点难以遵循。但基本上,一旦您创建了应用程序,您就需要 OAuth 2.0 密钥,您可以通过在凭据屏幕上打开应用程序区域来获取该密钥:
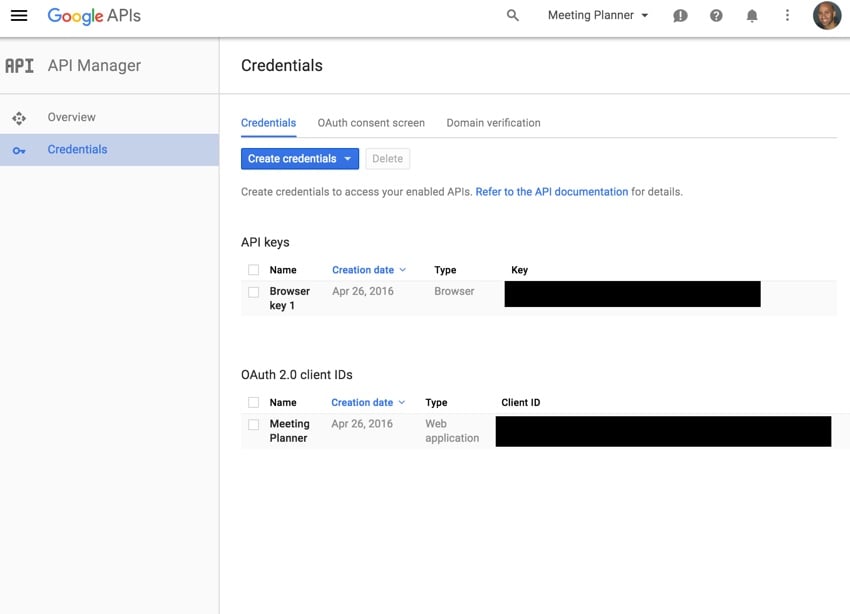
这将带您到这里:
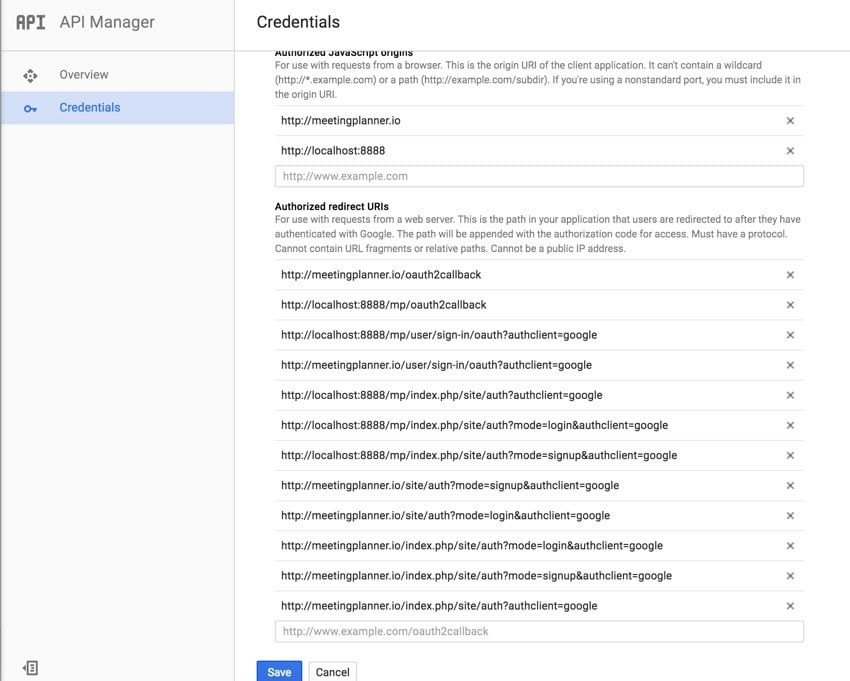
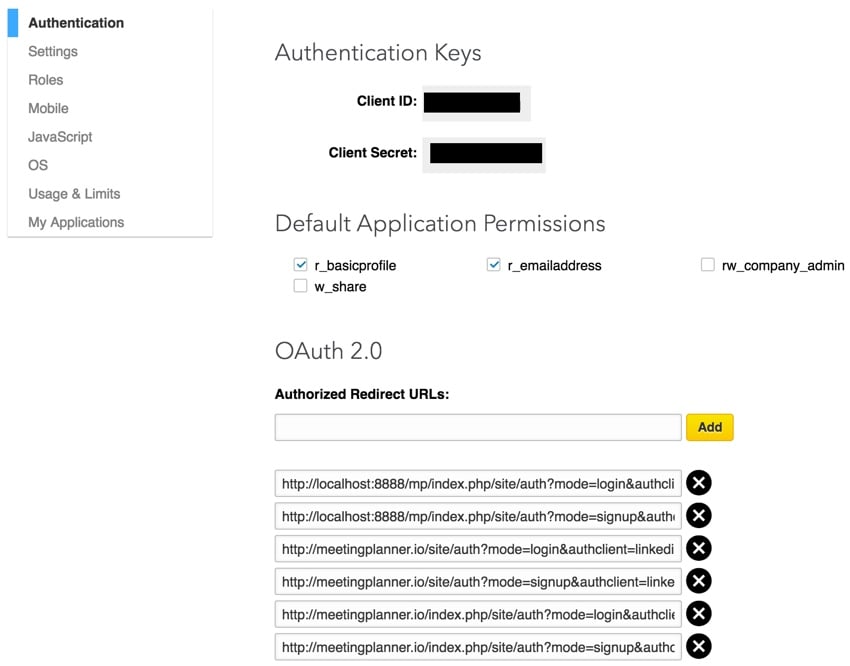
出于安全原因,Google(和 LinkedIn)需要完整列表,详细说明在执行过程中可能会使用哪些 URL 路径和参数。 OAuth 序列。在开发过程中,这可能需要大量调整 - 即使是从本地主机进行测试也是如此。
输入后,您将看到下面列出的内容:
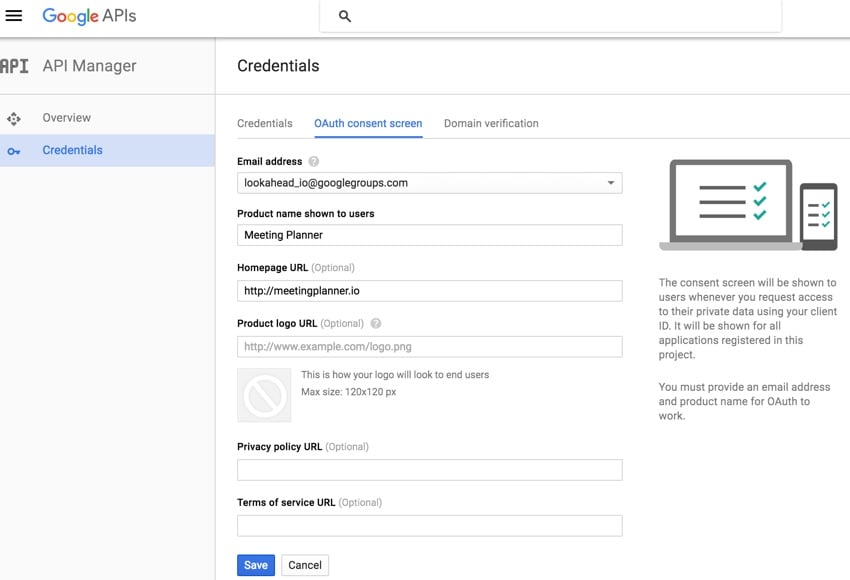
Google 在帮助您配置同意屏幕方面做得很好,您的用户在尝试注册或链接时将看到该屏幕他们的 Google 帐户与会议策划者的关系:
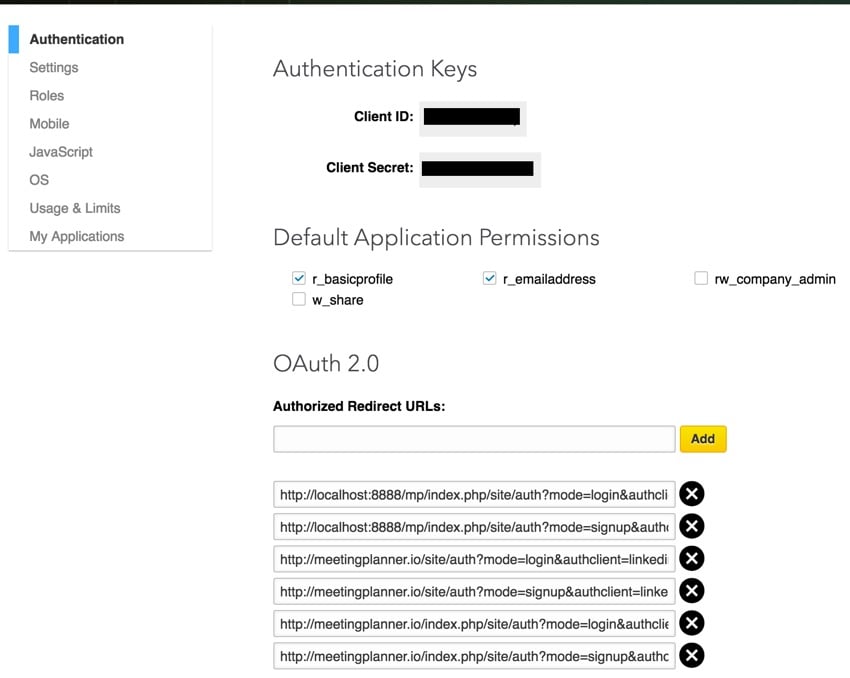
通过 LinkedIn 注册
与 Google 相比,LinkedIn 相当简单。您需要申请的基本详细信息:
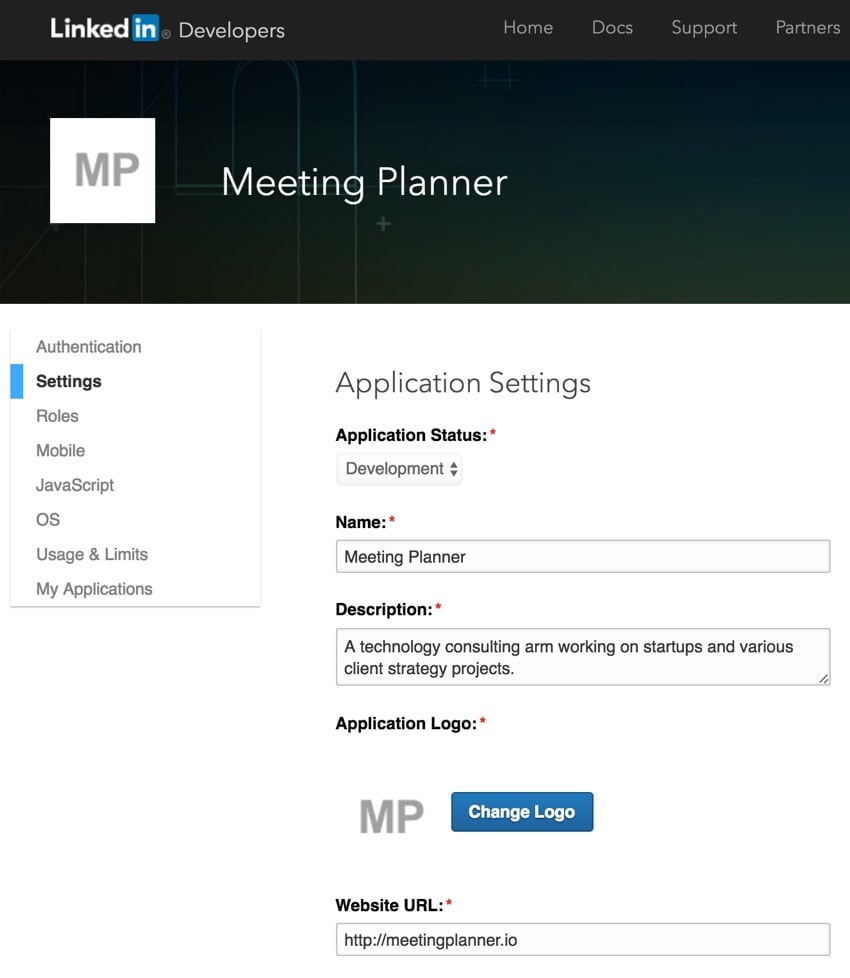
与 Google 一样,它们需要您在开发和生产中使用的所有网址。您还可以在此页面获取密钥:
将密钥放入我们的配置文件
在从 GitHub 中保护您的密钥中,我详细描述了如何使用配置文件来存储除 GitHub 存储库之外的所有密钥。然后,我将此文件包含在 Yii 配置文件的开头。这可以防止我意外地将我的密钥签入我的存储库并危及我的帐户。
我们将 Twitter 和 Facebook 应用程序密钥和机密放入存储库外部的 /var/secure/mp.ini 中:
oauth_fb_id="154xxxxxxxxxxxxxx33"
oauth_fb_secret="bcxxxxxxxxxxxxxxdda"
oauth_twitter_key ="JCpxxxxxxxxxxxxxxnsF"
oauth_twitter_secret="f3xxxxxxxxxxxxxxxxxxxxxxxxxxxxu37"
oauth_twitter_token="153xxxxxxxxxxxxxxxxxxxxxxxxxxxxxxxxxxxxxxxxxxfBj"
oauth_twitter_token_secret="Synxxxxxxxxxxxxxxxxxxxxxxxxxxxx4X"
oauth_google_client_id = "1xxxxxxxxxxxxxxxxxxxxxxq.apps.googleusercontent.com"
oauth_google_client_secret = "cfkxxxxxxxxxxxxxxox"
linkedin_client_id = "7xxxxxxxxxxxxxxq"
linkedin_client_secret ="IxxxxxxxxxxxxxxI"
这里又是 frontendconfigmain.php 中的代码,其中包含这些设置并设置各个配置变量:
<?php
$config = parse_ini_file('/var/secure/mp.ini', true);

$params = array_merge(
    require(__DIR__ . '/../../common/config/params.php'),
    require(__DIR__ . '/../../common/config/params-local.php'),
    require(__DIR__ . '/params.php'),
    require(__DIR__ . '/params-local.php')
);

return [
    'id' => 'app-frontend',
    'basePath' => dirname(__DIR__),
    'bootstrap' => ['log'],
    'controllerNamespace' => 'frontendcontrollers',
    'components' => [
      'authClientCollection' => [
              'class' => 'yiiauthclientCollection',
              'clients' => [
                  'google' => [
                      'class' => 'yiiauthclientclientsGoogleOpenId'
                  ],
                  'facebook' => [
                      'class' => 'yiiauthclientclientsFacebook',
                      'clientId' => $config['oauth_fb_id'],
                      'clientSecret' => $config['oauth_fb_secret'],
                  ],
                  'twitter' => [
                      'class' => 'yiiauthclientclientsTwitter',
                      'consumerKey' => $config['oauth_twitter_key'],
                      'consumerSecret' => $config['oauth_twitter_secret'],
                              ],
              ],
          ],
      'urlManager' => [
更新架构以存储会话密钥
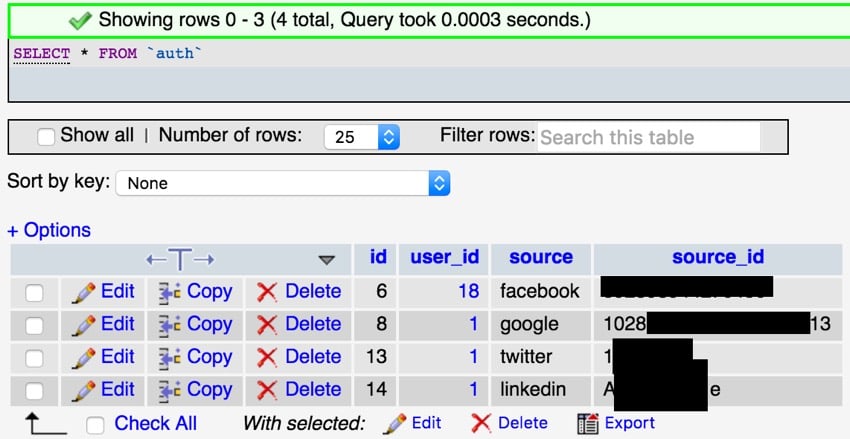
现在我们已经准备好编写代码来集成社交注册和登录,我们需要数据库来创建一个 Auth 表,该表将存储社交服务、该人的 ID 以及会议规划器中该人员的 user_id:
./yii migrate/create create_auth_table
Yii Migration Tool (based on Yii v2.0.2)

Create new migration '/Users/Jeff/Sites/mp/console/migrations/m150227_235635_create_auth_table.php'? (yes|no) [no]:yes
New migration created successfully.
迁移如下所示:
'<?php
use yiidbSchema;
use yiidbMigration;
class m150227_235635_create_auth_table extends Migration
{
public function up()
{
$tableOptions = null;
if ($this->db->driverName === 'mysql') {
$tableOptions = 'CHARACTER SET utf8 COLLATE utf8_unicode_ci ENGINE=InnoDB';
}
$this->createTable('{{%auth}}', [
'id' => Schema::TYPE_PK,
'user_id' => Schema::TYPE_BIGINT.' NOT NULL',
'source' => Schema::TYPE_STRING.' NOT NULL',
'source_id' => Schema::TYPE_STRING.' NOT NULL',
], $tableOptions);
$this->addForeignKey('fk-auth-user_id-user-id', '{{%auth}}', 'user_id', '{{%user}}', 'id', 'CASCADE', 'CASCADE');
}
public function down()
{
$this->dropForeignKey('fk-auth-user_id-user-id', '{{%auth}}');
$this->dropTable('{{%auth}}');
}
}
这是我们运行时的结果:
'./yii migrate/up
Yii Migration Tool (based on Yii v2.0.2)
Total 1 new migration to be applied:
m150227_235635_create_auth_table
Apply the above migration? (yes|no) [no]:yes
*** applying m150227_235635_create_auth_table
> create table {{%auth}} ... done (time: 0.016s)
> add foreign key fk-auth-user_id-user-id: {{%auth}} (user_id) references {{%user}} (id) ... done (time: 0.012s)
*** applied m150227_235635_create_auth_table (time: 0.033s)
Migrated up successfully.
我再次使用 Yii 的代码生成器 Gii 来创建 Auth 模型:

最终,Auth 表将包含如下内容:
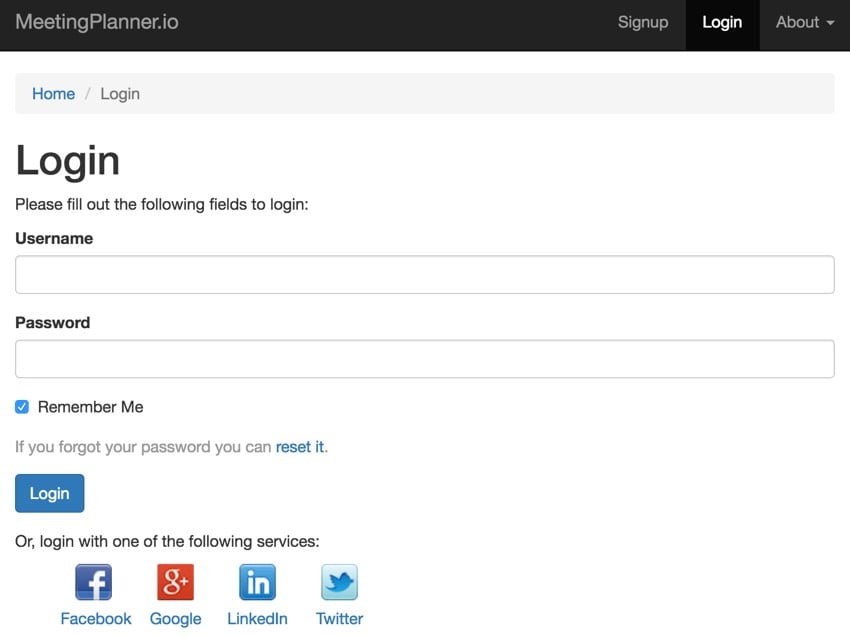
将 AuthChoice 小部件添加到会议规划器
Yii2 的 AuthChoice 小部件在为您配置的每个服务实现登录按钮方面做得非常出色。它按照您设置服务和密钥数组的顺序执行此操作(以便您可以更改它)。
将小部件添加到我们的表单(login.php 和 signup.php)非常简单:
'<div class="row">
<div class="col-lg-5">
<p>Or, login with one of the following services:</p>
<?= yiiauthclientwidgetsAuthChoice::widget([
'baseAuthUrl' => ['site/auth','mode'=>'login'],
'popupMode' => false,
]) ?>
</div> <!-- end col-lg-5 -->
</div> <!-- end row -->
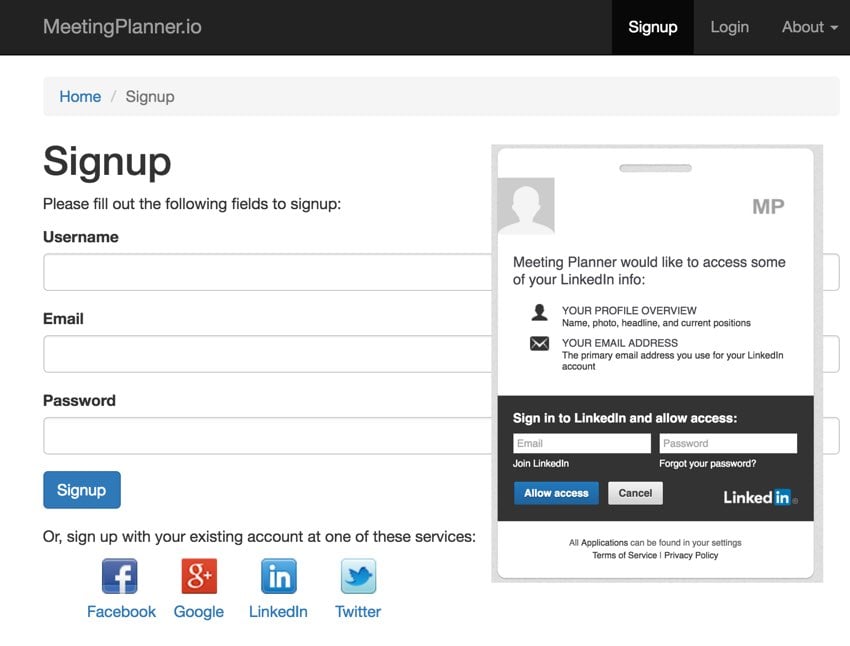
现在这是我们的注册页面:
对于已登录的现有用户,我为他们创建了一种简单的方法来关联其帐户。它在个人资料设置页面上称为关联社交帐户:
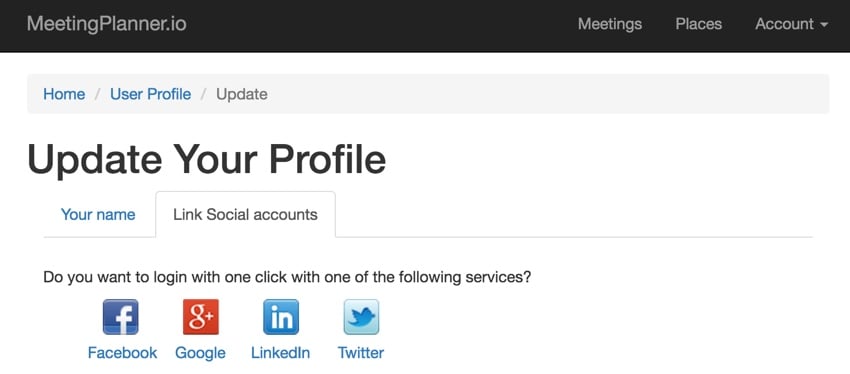
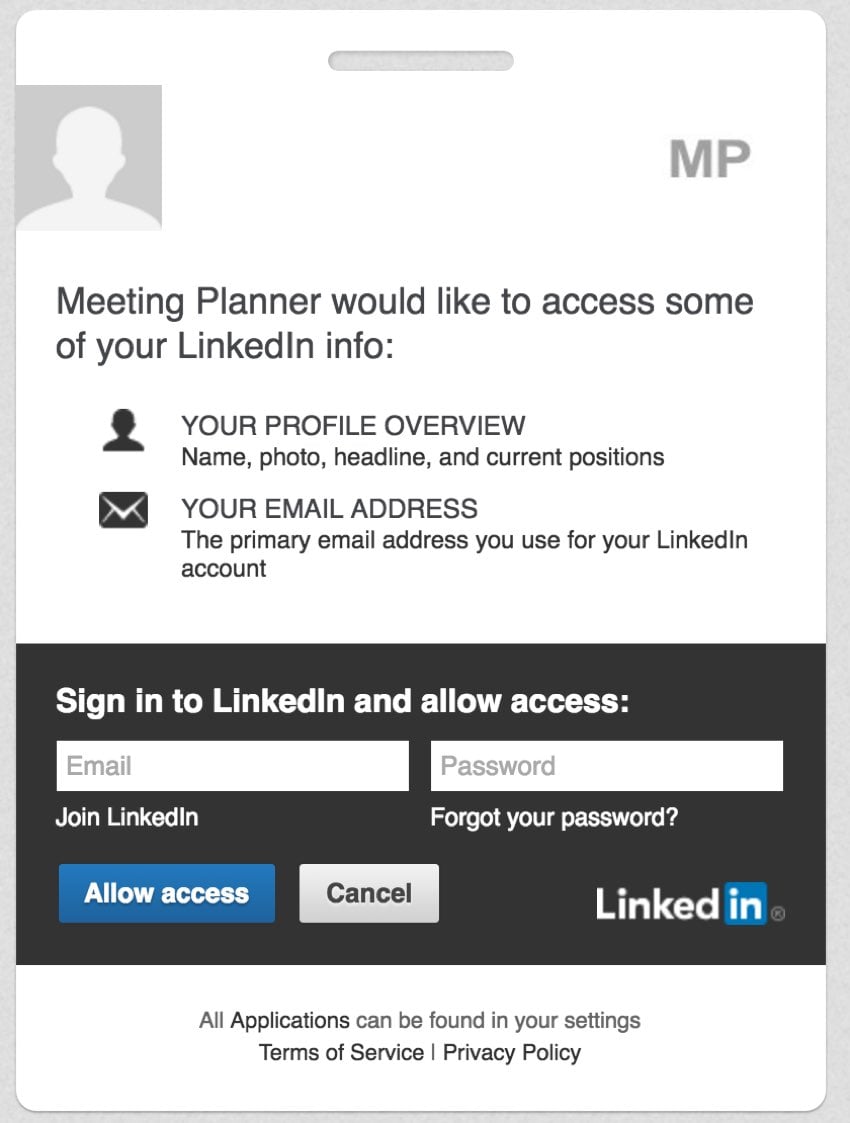
如果您点击LinkedIn,这是他们的 OAuth 屏幕,要求您授予会议策划者权限:
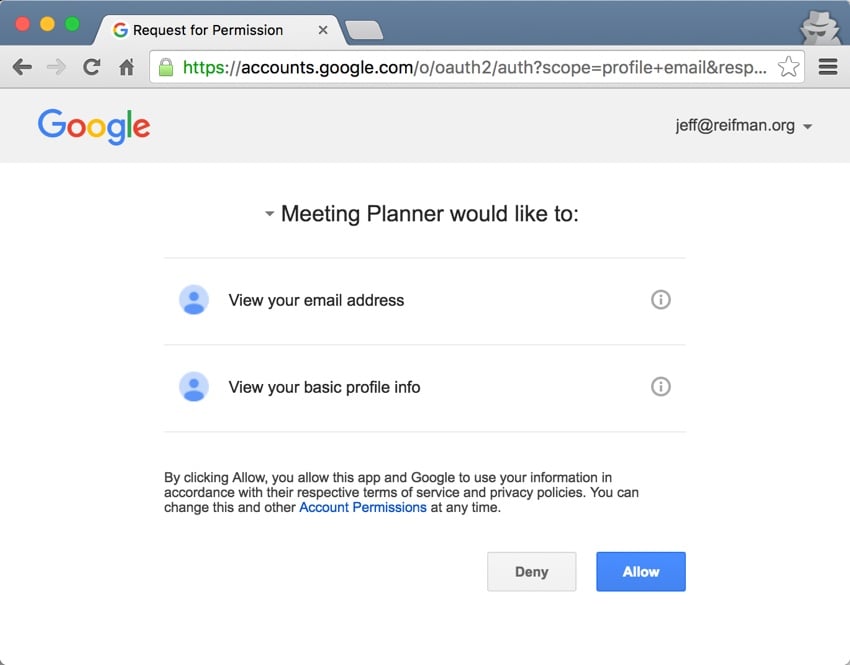
这是 Google 的屏幕:
但是当用户允许我们分享他们的社交帐户详细信息时,到底发生了什么?让我们看一下我编写的用于处理用户操作的代码。
处理 OAuth 权限
frontendcontrollersSiteController.php 处理传入的 auth 操作到函数 onAuthSuccess:
    /**
     * @inheritdoc
     */
    public function actions()
    {
        return [
            'error' => [
                'class' => 'yiiwebErrorAction',
            ],
            'captcha' => [
                'class' => 'yiicaptchaCaptchaAction',
                'fixedVerifyCode' => YII_ENV_TEST ? 'testme' : null,
            ],
            'auth' => [
                'class' => 'yiiauthclientAuthAction',
                'successCallback' => [$this, 'onAuthSuccess'],
            ],
        ];
    }
大多数优秀的 OAuth 客户端都会在类似的属性数组中提供类似的信息,Twitter 除外。 Twitter 在共享电子邮件地址方面起步较晚,对于我的 MVP 来说,现在不值得进行额外的工作来配置它。 Google 和 Facebook 更为流行。
首先,我正在收集服务详细信息并收集尽可能多的个人数据:电子邮件、名字和姓氏、全名,尤其是该社交网络中该用户的外部 ID:
'public function onAuthSuccess($client)
{
$mode = Yii::$app->getRequest()->getQueryParam('mode');
$attributes = $client->getUserAttributes();
$serviceId = $attributes['id'];
$serviceProvider = $client->getId();
$serviceTitle = $client->getTitle();
$firstname ='';
$lastname='';
$fullname ='';
switch ($serviceProvider) {
case 'facebook':
$username = $email = $attributes['email'];
$fullname = $attributes['name'];
break;
case 'google':
$email = $attributes['emails'][0]['value'];
if (isset($attributes['displayName'])) {
$fullname = $username = $attributes['displayName'];
}
if (isset($attributes['name']['familyName']) and isset($attributes['name']['givenName'])) {
$lastname = $attributes['name']['familyName'];
$firstname = $attributes['name']['givenName'];
}
break;
case 'linkedin':
$username = $email = $attributes['email-address'];
$lastname = $attributes['first-name'];
$firstname = $attributes['last-name'];
$fullname = $firstname.' '.$lastname;
break;
case 'twitter':
$username = $attributes['screen_name'];
$fullname = $attributes['name'];
// to do - fix social helpers
$email = $serviceId.'@twitter.com';
break;
}
// to do - split names into first and last with parser
$auth = Auth::find()->where([
'source' => (string)$serviceProvider,
'source_id' => (string)$serviceId,
])->one();
在上面的最后几行代码中,我们在 Auth 表中搜索此人的外部 ID。如果它们不存在,则它们对于 Meeting Planner 来说是新的。如果它们存在,我们就会认出它们。
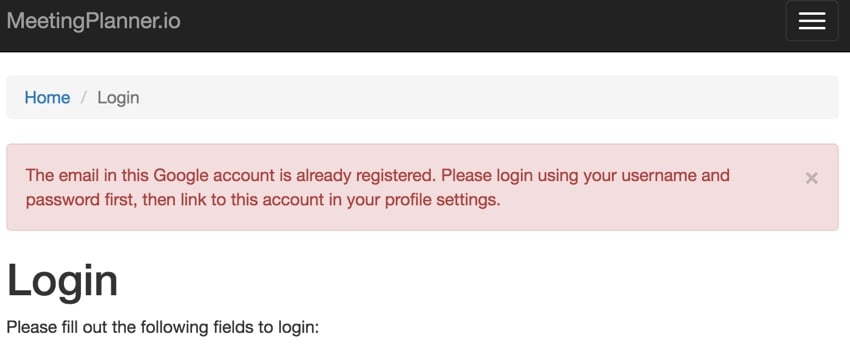
同样,我们需要检查他们的电子邮件地址是否已存在,因为该电子邮件地址的人可能之前已在 Meeting Planner 中注册过。
当 MeetingPlanner.io 当前没有经过身份验证的用户时,下面的代码将查看传入的用户数据。
如果外部 ID 已在我们的 Auth 表中,我们会将其登录。这对他们来说很简单!
如果我们无法识别该 ID,但我们已经注册了电子邮件地址,我们会要求他们通过用户名和密码登录,然后关联他们的帐户。
'if (Yii::$app->user->isGuest) {
if ($auth) {
// if the user_id associated with this oauth login is registered, try to log them in
$user_id = $auth->user_id;
$person = new commonmodelsUser;
$identity = $person->findIdentity($user_id);
Yii::$app->user->login($identity);
} else {
// it's a new oauth id
// first check if we know the email address
if (isset($email) && User::find()->where(['email' => $email])->exists()) {
// the email is already registered, ask person to link accounts after logging in
Yii::$app->getSession()->setFlash('error', [
Yii::t('frontend', "The email in this {client} account is already registered. Please login using your username and password first, then link to this account in your profile settings.", ['client' => $serviceTitle]),
]);
$this->redirect(['login']);
} else {
if ($mode == 'login') {
// they were trying to login with an unconnected account - ask them to login normally and link after
Yii::$app->getSession()->setFlash('error', [
Yii::t('frontend', "We don't recognize the user with this email from {client}. If you wish to sign up, try again below. If you wish to link {client} to your Meeting Planner account, login first with your username and password. Then visit your profile settings.", ['client' => $serviceTitle]),
]);
$this->redirect(['signup']);
}
接下来,如果他们在点击社交帐户按钮后进入登录页面,并且我们无法识别外部 ID或电子邮件地址,我们将他们重定向到注册页面并要求他们从注册页面重试。
如果他们从注册页面进行链接,我们将确保新用户不会面临(先前存在的 Meeting Planner 用户的)重复用户名的风险。在这种情况下,我们暂时用随机字符串扩展用户名。我们使用密码将他们注册为 Meeting Planner 的新用户(他们实际上并不需要密码)。
'else if ($mode == 'signup') {
// sign up a new account using oauth
// look for username that exists already and differentiate it
if (isset($username) && User::find()->where(['username' => $username])->exists()) {
$username.=Yii::$app->security->generateRandomString(6);
}
$password = Yii::$app->security->generateRandomString(12);
$user = new User([
'username' => $username, // $attributes['login'],
'email' => $email,
'password' => $password,
'status' => User::STATUS_ACTIVE,
]);
$user->generateAuthKey();
$user->generatePasswordResetToken();
$transaction = $user->getDb()->beginTransaction();
if ($user->save()) {
$auth = new Auth([
'user_id' => $user->id,
'source' => $serviceProvider, // $client->getId(),
'source_id' => $serviceId, // (string)$attributes['id'],
]);
if ($auth->save()) {
$transaction->commit();
Yii::$app->user->login($user);
} else {
print_r($auth->getErrors());
}
} else {
print_r($user->getErrors());
}
} // end signup
}
}
在上述最后步骤中,我们将其外部社交帐户详细信息添加到 Auth 表中,以供将来识别。
关联现有会议策划者帐户
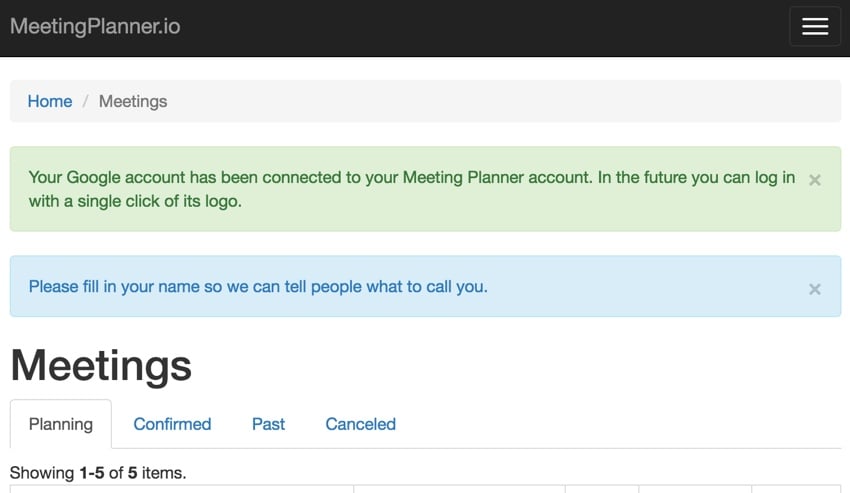
如果它们来自用户个人资料页面(而不是我们的登录或注册页面)上的“链接社交帐户”选项卡,那么我们只需将其外部帐户详细信息添加到 Auth ,并将其登录名移至 User::STATUS_ACTIVE。 (请记住,从会议策划者邀请链接到达但从未注册的用户具有 User::STATUS_PASSIVE 模式。)
} else {
  // user already logged in, link the accounts
    if (!$auth) { // add auth provider
        $auth = new Auth([
            'user_id' => Yii::$app->user->id,
            'source' => $serviceProvider,
            'source_id' => $serviceId,
        ]);
        $auth->validate();
        $auth->save();
        $u = User::findOne(Yii::$app->user->id);
        $u->status = User::STATUS_ACTIVE;
        $u->update();
        Yii::$app->session->setFlash('success', Yii::t('frontend', 'Your {serviceProvider} account has been connected to your Meeting Planner account. In the future you can log in with a single click of its logo.',
array('serviceProvider'=>$serviceTitle)));
    }
}
看起来是这样的(将来我会从 OAuth 信息中填写命名信息——还没有完成):
结束
我必须承认,与 Google、Facebook 和 LinkedIn 等主要服务建立 OAuth 连接的影响相当巨大。它使注册和定期使用 Meeting Planner 变得如此简单,并加快了未来的身份验证速度。这确实有点令人难以置信。
会议策划师在过去几个月里确实做到了齐心协力。请立即尝试社交登录和注册!请观看我们的“使用 PHP 构建您的初创公司”系列中即将推出的教程 - 随着产品走向 MVP,将会出现许多有趣的功能。
我还开始根据 SEC 新众筹规则的实施尝试 WeFunder。请考虑关注我们的个人资料。作为我们系列的一部分,我可能会更多地讨论这一点。
请随时在下面添加您的问题和评论;我一般都会参与讨论。您也可以通过 Twitter @reifman 联系我。我欢迎功能和主题请求。
如果您想知道下一个 Yii2 教程何时发布,请在 Twitter 上关注我@reifman 或查看我的讲师页面。我的讲师页面将立即包含本系列的所有文章。
相关链接
- 会议策划者:安排您的第一次会议
- 会议策划者资金概况
- 使用 Yii2 编程:入门
-
Yii 2 AuthClient 扩展指南
- Yii2 OAuth2 库文档
- Yii2 开发者交流会


